DWF6 ePlot.pc3, as shown in Figure 16-5. When you do so, AutoCAD automatically turns on the Plot To File setting. Then when you click OK to generate the ePlot, AutoCAD displays a file dialog box in which you specify a filename and location for the DWF file that gets created. The location can be a folder on a hard disk or a Web server.
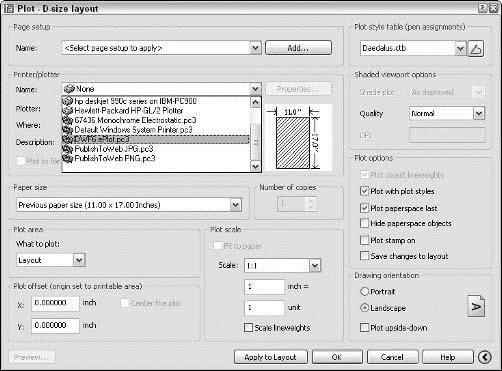
Figure 16-5: “Look ma, no paper!” Plotting to a DWF file.
 Pay particular attention to the Scale setting on the Plot Settings tab. If you’re creating a DWF simply for viewing in a browser, you can plot Scaled To Fit. If you want to enable others to ePlot your DWF file to scale, as described earlier in this chapter, you need to choose the desired plot scale factor. Chapter 12 describes how to choose an appropriate plot scale factor.
The ePlot method of creating DWF files described in the previous section works fine for single drawings. But if you want to create DWF files for a lot of drawings or plot a bunch of drawings the good ol’ fashioned way (on paper, that is), you can use the Publish dialog box, shown in Figure 16-6, to speed the process.
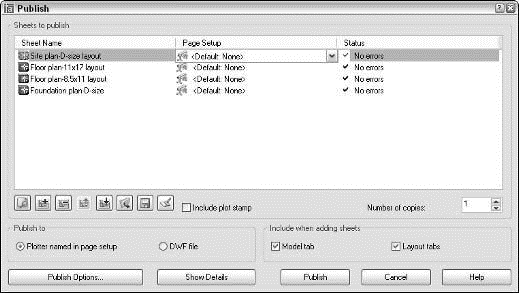
Figure 16-6: Hot off the presses: AutoCAD Publish dialog box.
Although the Publish dialog box is wired to support DWF as well as regular (paper) plotting, for now, more people are likely to use it for paper plotting. (An alternative use is creating plot files to send to a plotting service bureau.) But if you do decide to go into large-scale DWF publishing, including multisheet DWF files, use the Publish Drawing Sheets dialog box, as in the following steps.
1. Choose File>Publish.
The Publish dialog box appears (refer to Figure 16-6). The dialog box lists all tabs (Model and paper space layouts) of the current drawing for plotting. The Publish dialog box refers to each tab as a
2. Use the buttons below the sheet list to preview any sheet, add sheets from other drawings, remove sheets from the to-be-plotted list, or rearrange the plotting order.
With the additional buttons, you can save and recall lists of sheets. See Step 4 for more information.
3. After you specify the sheets that you want to plot, specify whether you want to plot them to an actual plotter or plot (PLT) file or to a DWF file.
You can select a specific plotter configuration for each sheet by choosing a Page Setup in the sheet list. See Chapter 12 for more information about page setups.
4. Click the Publish Options button to display a dialog box containing additional settings.
Most of these options are of concern only if you’re creating DWF files. The one exception is Default Output Directory, which also applies to creating plot (PLT) files.
5. Click the Save Sheet List button to save the current drawings and settings list, if you anticipate having to publish the same group of drawings again.
6. Click the Publish button to start the process.
 AutoCAD 2005’s new sheet sets feature (described in Chapter 14) includes a direct link to multisheet publishing. In the Sheet Set Manager palette, right-click the sheet set name and choose Publish. The submenu includes choices for publishing directly to a plotter or DWF file and for opening the Publish dialog box preloaded with all the sheet sets.
 Don’t confuse the PUBLISH command (File>Publish) with the PUBLISHTOWEB command (File>Publish to Web). The PUBLISH command creates sets of DWF files, plot files, or actual plots. The PUBLISHTOWEB Wizard creates a Web page containing images of your drawings. The results of this Wizard won’t put any Web designers or programmers out of work, but you can use it to create primitive Web page paste-ups of your drawings. See “PUBLISHTOWEB command” in the AutoCAD online help system if you’d like to give it a whirl.
 No Web file format would be complete without hyperlinks, and DWF has those, too. You can attach a hyperlink to any drawing object in AutoCAD, not just to a text string. As you pass the cursor over an object with a hyperlink, the cursor changes from the ordinary pointer to a globe and two links of a chain (as in “World Wide Web” and “link,” not “world-wide chain gang”). Right-click the object and select the Hyperlink option from the menu, which opens your browser and navigates to the URL that’s attached to the object. If you create a DWF file that includes objects with hyperlinks, Autodesk Express Viewer embeds the links in the DWF file so that you can Ctrl+click to navigate to them.
Hyperlinks on objects are a clever trick, but they’re of limited practical value in most DWG and DWF files:
? The drawing images are so small that it’s difficult to distinguish the hyperlink on one object from the hyperlink on another object.
? Most people aren’t used to associating hyperlinks with individual lines and other objects. The interface is likely to leave them perplexed.
If you’d like to experiment with hyperlinks in objects, look up “HYPERLINK command, about” in the online help system.
After you create DWF files, whether with ePlot or PUBLISH, you or the recipient of your DWF files can use Autodesk Express Viewer to view and print them. Autodesk Express Viewer, shown in Figure 16-4 earlier in this chapter, is a free viewer from Autodesk. You can download the current version from Autodesk’s Web page, www.autodesk.com (click on Product and Solutions and then Autodesk Express Viewer).
When you install AutoCAD 2005, the setup program by default installs Autodesk Express Viewer as well. Choose Start>Programs>Autodesk>Autodesk Express Viewer, or simply double-click on a DWF file in Windows Explorer, to launch it.
The Drawing Protection Racket
Whether you’re sending DWG or DWF files, you may be concerned about their misuse (that is, by the wrong people or for the wrong purposes), abuse (for example, modification without your consent), or reuse (on other projects or by other people without due compensation to you).
The previous version, AutoCAD 2004, added two new features for securing your drawings when you send them to others:
? Password protection enables you to lock a DWG or DWF file so that only those who type the password that you’ve specified can open, insert, or xref it.
Add password protection to drawings only when you really need it:
• If you forget the password, then
• After you password protect a drawing, others can’t insert the drawing as a block or attach it as an xref.
If you’re using a password, you probably should do it on a
? Digital signature is a high-tech way to add an electronic marker to a DWG file that verifies that someone approved the drawing. AutoCAD’s digital signature feature relies on fairly new technology by Microsoft. You must first get an account with a digital certificate provider, who serves to authenticate you and your computer. Of course, for this feature to be useful, you need to send drawings to someone who wants to receive digitally authenticated drawings from you (or vice versa) and who has the technological savvy to deal with digital certificates. For more information, see “digital signatures, learning more about” in the AutoCAD online help system.