AutoCAD’s Opening Screen Cuisine
When you launch AutoCAD after first installing it, the opening screen, shown in Figure 2-1, displays an arrangement of menus, toolbars, palettes, and a new, blank drawing. You can close the Sheet Set Manager and Tool Palettes for now — I describe how to turn them back on and how to use them later in this chapter. (If you installed the Express Tools, as I describe at the end of Chapter 1, you’ll also see a flock of small toolbars labeled ET. You can safely close all these and use the Express pull-down menu to access all the Express Tools.)

Figure 2-1: The clean AutoCAD 2005 screen.
As you see in Figure 2-1, much of the AutoCAD screen is standard Windows fare — title bars, a menu bar, toolbars, and a status bar.
Like most Windows programs, AutoCAD has a
? At the right side of the title bar is the standard set of three Windows control buttons: Minimize, Maximize/Restore, and Close.
? Each drawing window within the AutoCAD program window has its own title bar. You use the control buttons on a drawing window’s title bar to minimize, maximize/un-maximize, or close that drawing, not the entire AutoCAD program.
 As in other Windows programs, if you maximize a drawing’s window, it expands to fill the entire drawing area. (AutoCAD 2005 starts with the drawing maximized in this way.) As shown in Figure 2-1, the drawing’s control buttons move onto the menu bar, below the control buttons for the AutoCAD program window; the drawing’s name appears in the AutoCAD title bar. To un-maximize the drawing so you can see any other drawings that you have open, click the lower un-maximize button. The result is as shown in Figure 2 -2: a separate title bar for each drawing with the name and controls for that drawing.
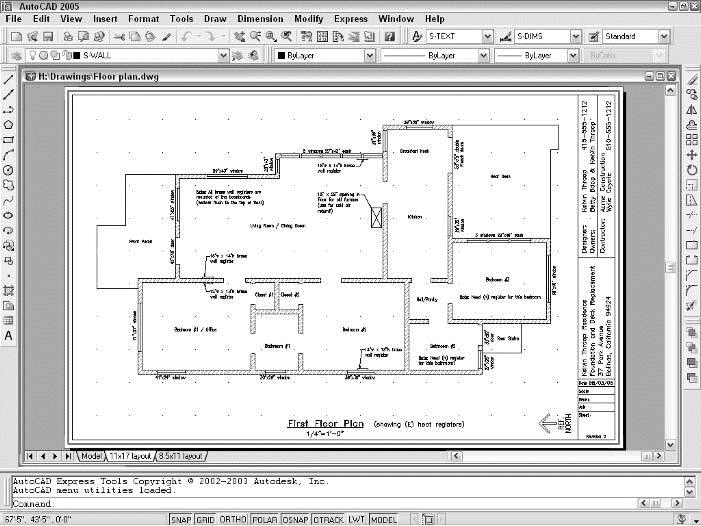
Figure 2-2: The AutoCAD screen with the drawing unmaximized.
Some standard tips and tricks for Windows are especially useful in AutoCAD. Control-key short cuts for the most popular functions — Ctrl+S to save, Ctrl+O to open a file, and Ctrl+P to print — work the same way in AutoCAD as in most other Windows programs. Use them!
Also worth exploring are the Alt-key shortcuts, which are available for all menu choices, not just the most popular ones. To fly around the menus, just press and hold the Alt key and then press the letters on your keyboard that correspond to the underlined letters on the menu bar and in the menu choices. To bring up the SAVEAS command, for example, just press and hold the Alt key, press F for File, and then press A for Save As.
The
As in other Windows programs, the toolbars in AutoCAD 2005 provide rapid access to the most commonly used AutoCAD commands. AutoCAD ships with toolbars in this default arrangement (as shown in Figure 2-3):
? Standard toolbar: Located on top, just below the menu bar; file management and other common Windows functions, plus some specialized AutoCAD stuff such as zooming and panning.
 ? Styles toolbar: To the right of the Standard toolbar; analogous to the left part of the Formatting toolbar in Microsoft programs, but formatting of AutoCAD’s text, dimension, and table styles. (Table styles are new in AutoCAD 2005.) Chapters 9 and 10 cover these features.
? Layers toolbar: Beneath the Standard toolbar; commands and a dropdown list for manipulating layers, which are AutoCAD’s fundamental tools for organizing and formatting objects. Chapter 4 contains the layer lowdown.
? Properties toolbar: To the right of the Layers toolbar; analogous to the right part of the Formatting toolbar in Microsoft programs, but formatting of AutoCAD’s properties, such as colors, linetypes, and lineweights. See Chapter 4 when you’re ready to play with AutoCAD’s object properties.
? Draw toolbar: Vertically down the far-left edge of the screen; the most commonly used commands from the Draw menu. Chapter 5 covers most of the items on this toolbar.
? Modify toolbar: Vertically down the far-right edge of the screen; the most commonly used commands from the Modify menu. Chapter 8 shows you how to use almost everything on this toolbar.
? Draw Order toolbar: Beneath the Modify toolbar; commands for controlling which objects appear on top of which other objects. Chapter 13 mentions these features.
You can rearrange, open, and close toolbars as in other Windows programs:
? To move a toolbar, point to its border (the double-line control handle at the leading edge of the toolbar is the easiest part to grab), click, and drag.
? To open or close toolbars, right-click on any toolbar button and choose from the list of available toolbars, as shown in Figure 2-3.
The AutoCAD screen in Figure 2-3 shows the default toolbar arrangement, which works fine for most people. Feel free to close the Draw Order toolbar; you aren’t likely to use its features frequently. You may want to turn on a couple of additional toolbars, such as Object Snap and Dimension, as you discover and make use of additional features. Throughout this book, I point out when a particular toolbar may be useful.
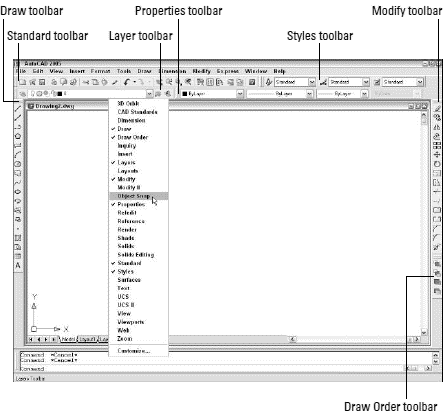
Figure 2-3: A toolbar tasting.
If you’ve installed the Express Tools, you’ll also see a flock of Express Tools toolbars, whose labels begin with “ET:”, floating over the drawing area. These four small toolbars collect some of the most popular Express Tools. You’ll probably want to close most of these or at least dock any favorites along the margin of the AutoCAD window.
The toolbars are extensions to AutoCAD, not part of the core program, so turning them on is a little more complicated than just using the right-click toolbars menu. Right-click on any toolbar, choose Customize, click the Toolbars tab on the Customize dialog box, and choose the EXPRESS Menu Group. Now the Toolbars list displays the names of the four Express Tools toolbars; click the check boxes next to the names in order to toggle each toolbar on or off.
 If you’re not satisfied with just rearranging the stock AutoCAD toolbars, you can customize their contents or even create new ones. The procedures are beyond the scope of this book; they involve bouncing among the Commands, Toolbars, and Properties tabs on the Customize dialog box in not entirely intuitive ways. Resist slicing and dicing the stock AutoCAD toolbars until you’re at least somewhat familiar with them. If you want to get creative thereafter, go to the Contents tab of the AutoCAD 2005 online help and choose Customization Guide>Basic Customization>Create Custom Toolbars.
AutoCAD toolbar buttons provide