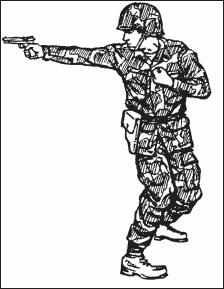
c. Quick-Fire Point Shooting. This is for engaging an enemy at less than 5 yards and is also useful for night firing. Using a two-hand grip, the firer brings the weapon up close to the body until it reaches chin level. He then thrusts it forward until both arms are straight. The arms and body form a triangle, which can be aimed as a unit. In thrusting the weapon forward, the firer can imagine that there is a box between him and the enemy, and he is thrusting the weapon into the box. The trigger is smoothly squeezed to the rear as the elbows straighten.
d. Quick-Fire Sighting. This technique is for engaging an enemy at 5 to 10 yards away and only when there is no time available to get a full picture. The firing position is the same as for quick-fire point shooting. The sights are aligned left and right to save time, but not up and down. The firer must determine in practice what the sight picture will look like and where the front sight must be aimed to hit the enemy in the chest.
2-8. Target Engagement
In close combat, there is seldom time to precisely apply all of the fundamentals of marksmanship. When a soldier fires a round at the enemy, he often does not know if he hits his target. Therefore, two rounds should be fired at the target. This is called controlled pairs. If the enemy continues to attack, two more shots should be placed in the pelvic area to break the body’s support structure, causing the enemy to fall.
2-9. Traversing
In close combat, the enemy may be attacking from all sides. The soldier may not have time to constantly change his position to adapt to new situations. The purpose of the crouching or kneeling 360-degree traverse is to fire in any direction without moving the feet.
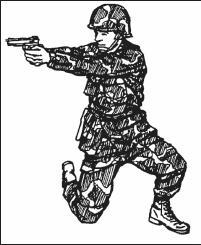
a. Crouching 360-Degree Traverse. The following instructions are for a right-handed firer. The two-hand grip is used at all times except for over the right shoulder. The firer remains in the crouch position with feet almost parallel to each other. Turning will be natural on the balls of the feet.
(1)
(2)
(3)
(4)


(5)
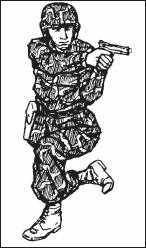
b. Kneeling 360-Degree Traverse. The following instructions are for right-handed firers. The hands are in a two-hand grip at all times. The unsupported kneeling position is used. The rear foot must be positioned to the left of the front foot.
(1)
(2)
(3)
(4)


(5)

c. Training Method. This method can be trained and practiced anywhere and, with the firer simulating a two-hand grip, without a weapon. The firer should be familiar with firing in all five directions.
2-10. Combat Reloading Techniques
Overlooked as a problem for many years, reloading has resulted in many casualties due to soldiers’ hands shaking or errors such as dropped magazines, magazines placed in the pistol backwards, or empty magazines placed back into the weapon. The stress state induced by a life-threatening situation causes soldiers to do things they would not otherwise do. Consistent, repeated training is needed to avoid such mistakes.
NOTE: These procedures should be used only in combat, not on firing ranges.
a. Develop a consistent method for carrying magazines in the ammunition pouches. All magazines should