• Trigger squeeze.
• Target engagement.
• Positions.
2-1. Grip
A proper grip is one of the most important fundamentals of quick fire. The weapon must become an extension of the hand and arm; it should replace the finger in pointing at an object. The firer must apply a firm, uniform grip to the weapon.
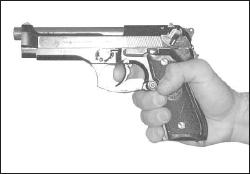
a. One-Hand Grip. Hold the weapon in the nonfiring hand; form a V with the thumb and forefinger of the strong hand (firing hand). Place the weapon in the V with the front and rear sights in line with the firing arm. Wrap the lower three fingers around the pistol grip, putting equal pressure with all three fingers to the rear. Allow the thumb of the firing hand to rest alongside the weapon without pressure (Figure 2-1). Grip the weapon tightly until the hand begins to tremble; relax until the trembling stops. At this point, the necessary pressure for a proper grip has been applied. Place the trigger finger on the trigger between the tip and second joint so that it can be squeezed to the rear. The trigger finger must work independently of the remaining fingers.

NOTE: If any of the three fingers on the grip are relaxed, the grip must be reapplied.
b. Two-Hand Grip. The two-hand grip allows the firer to steady the firing hand and provide maximum support during firing. The nonfiring hand becomes a support mechanism for the firing hand by wrapping the fingers of the nonfiring hand around the firing hand. Two-hand grips are recommended for all pistol firing.
(1)
NOTE: Depending upon the individual firer, he may chose to place the index finger of his nonfiring hand on the front of the trigger guard since M9 and M11 pistols have a recurved trigger guard designed for this purpose.

(2)

(3)

c. Isometric Tension. The firer raises his arms to a firing position and applies isometric tension. This is commonly known as the push-pull method for maintaining weapon stability. Isometric tension is when the firer applies forward pressure with the firing hand and pulls rearward with the nonfiring hand with equal pressure. This creates an isometric force but never so much to cause the firer to tremble. This steadies the weapon and reduces barrel rise from recoil. The supporting arm is bent with the elbow pulled downward. The firing arm is fully extended with the elbow and wrist locked. The firer must experiment to find the right amount of isometric tension to apply.
NOTE: The firing hand should exert the same pressure as the nonfiring hand. If it does not, a missed target could result.
d. Natural Point of Aim. The firer should check his grip for use of his natural point of aim. He grips the weapon and sights properly on a distant target. While maintaining his grip and stance, he closes his eyes for three to five seconds. He then opens his eyes and checks for proper sight picture. If the point of aim is disturbed, the firer adjusts his stance to compensate. If the sight alignment is disturbed, the firer adjusts his grip to compensate by removing the weapon from his hand and reapplying the grip. The firer repeats this process until the sight alignment and sight placement remain almost the same when he opens his eyes. With sufficient practice, this enables the firer to determine and use his natural point of aim, which is the most relaxed position for holding and firing the weapon.
2-2. Aiming
Aiming is sight alignment and sight placement (Figure 2-5).
a. Sight alignment is the centering of the front blade in the rear sight notch. The top of the front sight is level with the top of the rear sight and is in correct alignment with the eye. For correct sight alignment, the firer must center the front sight in the rear sight. He raises or lowers the top of the front sight so it is level with the top of the rear sight. Sight alignment is essential for accuracy because of the short sight radius of the pistol. For example, if a 1/10-inch error is made in aligning the front sight in the rear sight, the firer’s bullet will miss the point of aim by about 15 inches at a range of 25 meters. The 1/10-inch error in sight alignment magnifies as the range increases–at 25 meters, it is magnified 150 times.
b. Sight placement is the positioning of the weapon’s sights in relation to the target as seen by the firer when he aims the weapon (Figure 2-5). A correct sight picture consists of correct sight alignment with the front sight placed center mass of the target. The eye can focus on only one object at a time at different distances. Therefore, the last focus of the eye is always on the front sight. When the front sight is seen clearly, the rear sight and target will appear hazy. The firer can maintain correct sight alignment only through focusing on the front sight. His bullet will hit the target even if the sight picture is partly off center but still remains on the target. Therefore, sight alignment is more important than sight placement. Since it is impossible to hold the weapon completely still, the firer must apply trigger squeeze and maintain correct sight alignment while the weapon is moving in and around the center of the target. This natural movement of the weapon is referred to as wobble area. The firer must strive to control the limits of the wobble area through proper grip, breath control, trigger squeeze, and positioning.


