survival.
NOTE: During combat, there may not be time for a soldier to assume a position that will allow him to establish his natural point of aim. Firing from a covered position may require the soldier to adapt his shooting stance to available cover.
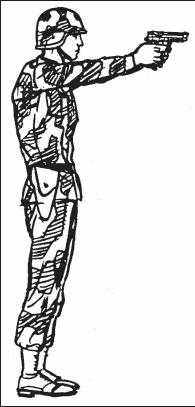
a. Pistol-Ready Position. In the pistol-ready position, hold the weapon in the one-hand grip. Hold the upper arm close to the body and the forearm at about a 45-degree angle. Point the weapon toward target center as you move forward (Figure 2-8).

b. Standing Position without Support. Face the target (Figure 2-9). Place feet a comfortable distance apart, about shoulder width. Extend the firing arm and attain a two-hand grip. The wrist and elbow of the firing arm are locked and pointed toward target center. Keep the body straight with the shoulders slightly forward of the buttocks.
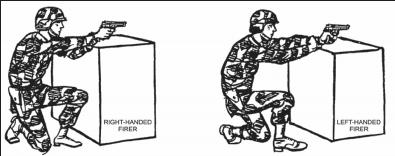
c. Kneeling Position. In the kneeling position, ground only your firing-side knee as the main support (Figure 2-10). Vertically place your firing-side foot, used as the main support, under your buttocks. Rest your body weight on the heel and toes. Rest your nonfiring arm just above the elbow on the knee not used as the main body support. Use the two-handed grip for firing. Extend the firing arm, and lock the firing-arm elbow and wrist to ensure solid arm control.

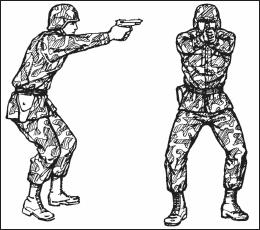
d. Crouch Position. Use the crouch position when surprise targets are engaged at close range (Figure 2-11). Place the body in a forward crouch (boxer’s stance) with the knees bent slightly and trunk bent forward from the hips to give faster recovery from recoil. Place the feet naturally in a position that allows another step toward the target. Extend the weapon straight toward the target, and lock the wrist and elbow of the firing arm. It is important to consistently train with this position, since the body will automatically crouch under conditions of stress such as combat. It is also a faster position from which to change direction of fire.
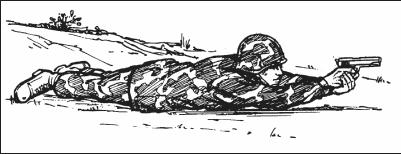
e. Prone Position. Lie flat on the ground, facing the target (Figure 2-12). Extend your arms in front with the firing arm locked. (Your arms may have to be slightly unlocked for firing at high targets.) Rest the butt of the weapon on the ground for single, well-aimed shots. Wrap the fingers of the nonfiring hand around the fingers of the firing hand. Face forward. Keep your head down between your arms and behind the weapon as much as possible.
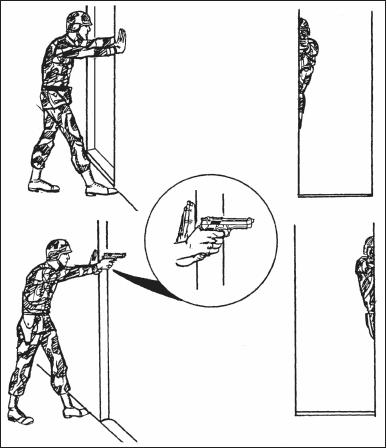
f. Standing Position with Support. Use available cover for support–for example, a tree or wall to stand behind (Figure 2-13). Stand behind a barricade with the firing side on line with the edge of the barricade. Place the knuckles of the nonfiring fist at eye level against the edge of the barricade. Lock the elbow and wrist of the firing arm. Move the foot on the nonfiring side forward until the toe of the boot touches the bottom of the barricade.
g. Kneeling Supported Position. Use available cover for support–for example, use a low wall, rocks, or vehicle (Figure 2-14). Place your firing-side knee on the ground. Bend the other knee and place the foot (nonfiring side) flat on the ground, pointing toward the target. Extend arms alongside and brace them against available cover. Lock the wrist and elbow of your firing arm. Place the nonfiring hand around the fist to support the firing arm. Rest the nonfiring arm just above the elbow on the nonfiring-side knee.
SECTION II. COMBAT MARKSMANSHIP
After a soldier becomes proficient in the fundamentals of marksmanship, he progresses to advanced techniques of combat marksmanship. The main use of the pistol is to engage the enemy at close range with quick, accurate fire. In shooting encounters, it is not the first round fired that wins the engagement, but the first accurately fired round. The soldier should use his sights when engaging the enemy unless this would place the weapon within arm’s reach of the enemy.
2-7. Techniques of Firing
Firing techniques include the use of hand-and-eye coordination, flash sight picture, quick-fire point shooting, and quick-fire sighting.
a. Hand-and-Eye Coordination. Hand-and-eye coordination is not a natural, instinctive ability for all soldiers. It is usually a learned skill obtained by practicing the use of a flash sight picture (see paragraph b below). The more a soldier practices raising the weapon to eye level and obtaining a flash sight picture, the more natural the relationship between soldier, sights, and target becomes. Eventually, proficiency elevates to a point so that the soldier can accurately engage targets in the dark. Each soldier must be aware of this trait and learn how to use it best. Poorly coordinated soldiers can achieve proficiency through close supervision from their trainers. Everyone has the ability to point at an object. Since pointing the forefinger at an object and extending the weapon toward a target are much the same, the combination of the two are natural. Making the soldier aware of this ability and teaching him how to apply it results in success when engaging enemy targets in combat.
(1) The eyes focus instinctively on the center of any object observed. After the object is sighted, the firer aligns his sights on the center of mass, focuses on the front sight, and applies proper trigger squeeze. Most crippling or killing hits result from maintaining the focus on the center of mass. The eyes must remain fixed on some part of the target throughout firing.
(2) When a soldier points, he instinctively points at the feature on the object on which his eyes are focused. An impulse from the brain causes the arm and hand to stop when the finger reaches the proper position. When the eyes are shifted to a new object or feature, the finger, hand, and arm also shift to this point. It is this inherent trait that can be used by the soldier to engage targets rapidly and accurately. This instinct is called hand- and-eye coordination.
b. Flash Sight Picture. Usually, when engaging an enemy at pistol range, the firer has little time to ensure a correct sight picture. The quick-kill (or natural point of aim) method does not always ensure a first-round hit. A compromise between a correct sight picture and the quick-kill method is known as a flash sight picture. As the soldier raises the weapon to eye level, his point of focus switches from the enemy to the front sight, ensuring that the front and rear sights are in proper alignment left and right, but not necessarily up and down. Pressure is applied to the trigger as the front sight is being acquired, and the hammer falls as the flash sight picture is confirmed. Initially, this method should be practiced slowly, with speed gained as proficiency increases.